Debug Mode
Validate Data Layer events in real-time before deploying to production.
Overview
Follow this guide to learn how to use Elevar’s Debug Mode to validate Data Layer events directly in your browser during development and testing.
The Elevar debugger runs in the browser console and monitors events as they are pushed to the Elevar Data Layer. As you interact with your site, the debugger evaluates each event and provides immediate feedback.
When events are pushed to the Data Layer, the debugger automatically:
- Validates event structure against Elevar’s expected schemas
- Identifies missing, incompatible, or incorrectly typed fields
- Displays detailed error messages for events that fail validation
TIP
Validate all Data Layer events before deploying to production. Events that fail validation may not be processed by marketing destinations, resulting in data loss and tracking issues.
Enable the Debugger
To enable Debug Mode, run the following command in your browser’s developer console:
window.ElevarDebugMode(true);If the command runs successfully, Debug Mode is enabled and you can begin Validate Events as they fire.
WARNING
If you receive an error like Uncaught TypeError: window.ElevarDebugMode is not a function, ensure Elevar's script is placed as-is without any modifications on all pages where you're testing events. Any modifications to the script will prevent the debugger from working.
Disable the Debugger
To disable Debug Mode, run the following command in the console:
window.ElevarDebugMode(false);You can also disable Debug Mode by clearing your browser’s local storage. Disabling the debugger is recommended once testing is complete to avoid unnecessary console output.
Validate Events
After enabling the debugger, navigate through your site and trigger events by performing typical user actions such as viewing products, adding items to the cart, or starting checkout.
As each event is pushed to the Data Layer, the debugger displays validation results in the console. These results indicate whether the event passed validation or failed due to schema or data issues.
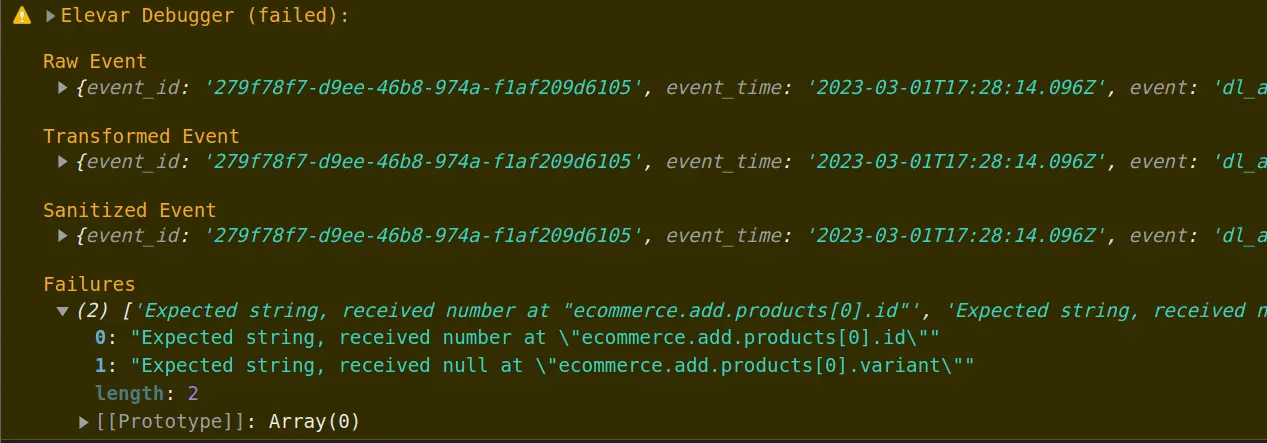
Failed Event Example
The following example demonstrates a failed dl_add_to_cart event caused by incorrect field types:
window.ElevarDataLayer.push({
  event: "dl_add_to_cart",
  ecommerce: {
    currencyCode: "USD",
    add: {
      actionField: {
        list: "/collections/all"
      },
      products: [
        {
          id: 41230516256821, // ❌ Should be string
          name: "Bedside Table",
          brand: "Company 123",
          category: "Indoor",
          variant: null, // ❌ Should be string
          price: "69.99",
          quantity: "1",
          list: "/collections/all",
          product_id: "6938075758645",
          variant_id: "41230516256821",
          image: "https://cdn.shopify.com/small.png"
        }
      ]
    }
  }
});
Debugger Output
In this case, the debugger reports a failure and highlights the specific issues:
- The
ecommerce.add.products[0].idshould be a string (not a number) - The
ecommerce.add.products[0].variantshould be a string (not null).
Corrected Event Example
After fixing the field types, the event can be pushed again:
window.ElevarDataLayer.push({
  event: "dl_add_to_cart",
  ecommerce: {
    currencyCode: "USD",
    add: {
      actionField: {
        list: "/collections/all"
      },
      products: [
        {
          id: "41230516256821", // ✔️ Now string
          name: "Bedside Table",
          brand: "Company 123",
          category: "Indoor",
          variant: "12345324123423", // ✔️ Now string
          price: "69.99",
          quantity: "1",
          list: "/collections/all",
          product_id: "6938075758645",
          variant_id: "41230516256821",
          image: "https://cdn.shopify.com/small.png",
          url: "https://domain.com/products/womens-shoe?variant=123"
        }
      ]
    }
  }
});
Successful Validation
After correcting the errors, the debugger displays a success message in the console, confirming that the event passed validation and is eligible for processing.

Testing Workflow
Follow this workflow to validate your implementation:
- Enable the debugger using the commands above
- Navigate through your site and trigger each event type
- Check the console after each interaction for validation results
- Fix any failures by fixing field types, missing properties, or schema violations
- Retest until all events pass validation
- Deploy to production only after all events validate successfully
TIP
For a comprehensive list of error codes and their solutions, see Debug Mode Codes.